Who wants to break the bank or waste endless days on a home improvement project? Certainly not you. And if you’re purchasing a budget sprayer from a popular brand, efficiency becomes paramount. I’m here to make your home decorating process easier. Introducing the HomeRight Finish Max Sprayer – a lightweight and affordable economy sprayer that will transform your painting experience so you can enjoy your home’s beauty more.
I owned the HomeRight C800766 Sprayer for about a year, but we only used it for small projects. After painting my furniture with it last week, I thought I’d share some tips and a HomeRight Finish Max review that may be helpful. So, get ready to discover the secrets of a successful furniture makeover that will leave you delighted with the outcome.
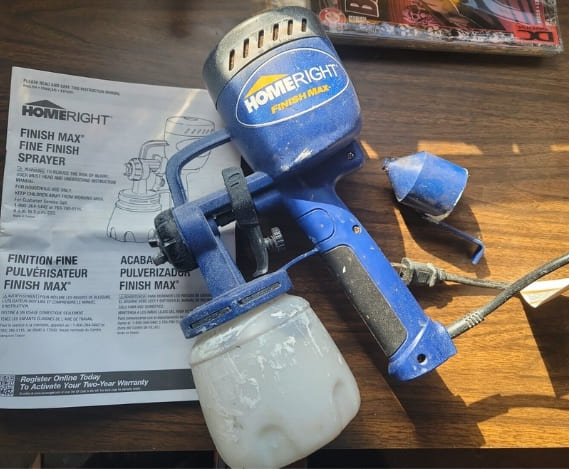
Table of Contents
- Why I Use HomeRight Finish Max sprayer C800766?
- Painting Furniture With HomeRight Finish Max
- Homeright Finish Max Vs Wagner
- HomeRight Finish Max vs Super Finish Max
- What Comes with My HomeRight Finish Max?
- Is there anything else I need with my HomeRight Finish Max?
- How do you use HomeRight finish Max paint sprayer?
- How to Clean the HomeRight Finish Max?
- Homeright finish max manual
- My Verdict On Homeright Finish Max C800766
- FAQS On HomeRight Finish Max sprayer Review
- Why is my Homeright Finish Max not spraying?
- Does Wagner own Homeright?
- Why is my paint sprayer not holding pressure?
- Do you need to thin paint for HomeRight sprayer?
- How to thin paint for a HomeRight sprayer?
Why I Use HomeRight Finish Max sprayer C800766?
When choosing the HomeRight Finish Max, it’s important to consider your specific painting needs. I chose Finish Max because it sprays oil or water-based materials. This includes primers, chalk type paint, milk paint, latex paints, enamels, and polyurethane. However, I do not recommend using HomeRight Finish sprayer for lacquers and acetone due to their flammability.
Moreover, if you frequently work with oil-based products, it’s worth noting that the sprayer parts may wear quickly due to the harsh chemicals used for cleanup. Therefore, I mostly used water-based materials with the HomeRight Finish Max Paint Sprayer.
What makes Finish Max stand out is its ability to deliver a smooth, professional finish without a compressor. Whether you’re working on furniture, cabinets, dressers, or doors, this paint sprayer excels at laying down a fine quality coat with minimal overspray. So, if you’re looking for an easy-to-use sprayer that provides exceptional results and is suitable for water-based projects, the HomeRight Finish Max is the ideal choice.
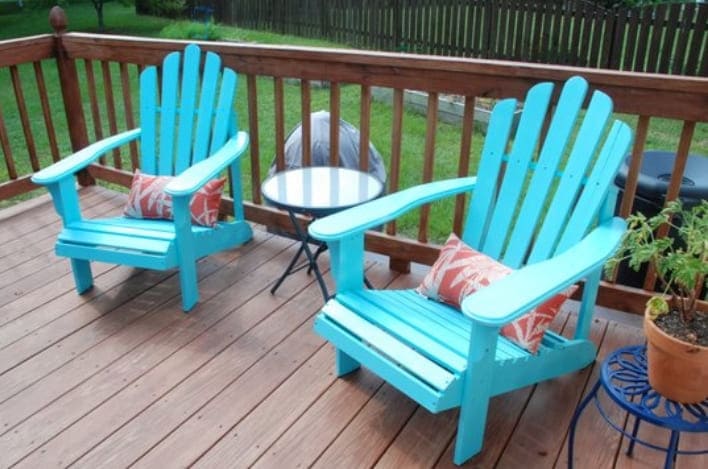
Painting Furniture With HomeRight Finish Max
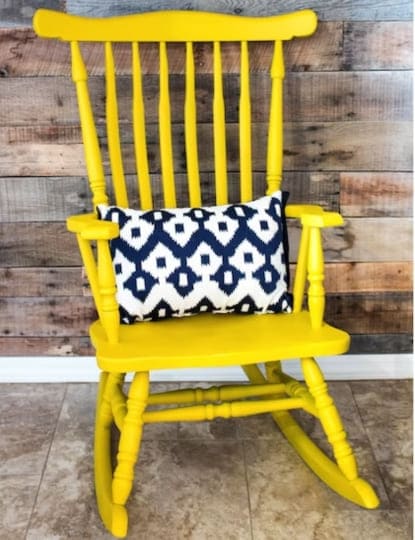
If you’ve ever had the unfortunate experience of using the old Wagner sprayer that left spit marks, sprayed unevenly, and created a mess everywhere, then you’ll be absolutely thrilled with this product I found. I used it for painting chairs, furniture and doors etc. Let me tell you, it’s truly a winner!
The first notable feature of this sprayer is its lightweight design, which makes it incredibly easy to handle during painting projects. However, I was very pleased with its minimal overspray. With the old Wagner sprayer, I had to constantly worry about covering everything nearby, but this one keeps the overspray to a minimum, saving me a ton of time and effort in cleanup.
Before using the sprayer, you do need to mix your paint and thin it out, and it’s recommended to strain it to ensure smooth spraying. But once you’ve got that ready, the rest is a breeze. The sprayer feels perfectly balanced in your hand, and its ergonomic design makes it comfortable to use for extended periods.
I particularly appreciated how easy it was to clean after each use. No need for any additional cleaner attachments – just run some soapy water through it, open the nozzle to clean the needle and other parts, and it’s as good as new for your next painting project.
One important tip I found is to keep the sprayer at a right angle for an even spray pattern. It took a little practice, but once I got the hang of it, the results were impressive. The paint went on smoothly and evenly, giving my furniture a professional finish.
Overall, it truly is a time-saver and has made my painting projects so much more enjoyable. Just keep in mind that you’ll need to thin your paint quite a bit, but the results are well worth it. Give it a try, and I’m confident you’ll be as satisfied with it as I am!
PROS:
CONS:
Homeright Finish Max Vs Wagner
The HomeRight Finish model boasts a user-friendly, handheld design that prioritizes simplicity, like the Wagner 590. If you’re looking for a lighter sprayer for extended use, the weight difference may be a factor to consider. The Wagner 590 weighs 2.1 pounds, while the HomeRight Finish model weighs more at 3.1 pounds.
Another aspect that contrasts is the paint capacity. The Wagner 590 can hold up to 8 gallons of paint, which is significantly higher than the HomeRight Finish model’s capacity of 1-2 gallons. If you have a large project that requires frequent refills, the Wagner 590 might be more suitable due to its larger paint capacity.
However, the HomeRight Finish model offers its own advantages. It is designed to cover a decent-sized area quickly, making it a time-efficient option. Additionally, both sprayers have a handheld design and are known for their simplicity, allowing for easy operation. The HomeRight Finish model, similar to the Wagner 590, is ready to use right out of the box with minimal assembly required.
In terms of value for money and usability, the HomeRight Finish model shines as a budget-friendly option for occasional use. It may be the preferred choice when considering affordability and practicality. On the other hand, if you have a larger project that demands a higher paint capacity and are willing to invest in a branded model, the Wagner 590 could be a better fit.
Useful Resource:
For a full comparison of Wagner and HomeRight, click here!
HomeRight Finish Max vs Super Finish Max
Let me share my personal experience with the Super Finish Max and Finish Max paint sprayers and discuss the differences between them. As someone who enjoys painting furniture as a hobby, I’ve used both HomeRight products. I must say, they each have their own unique features that make them stand out.
Firstly, let’s talk about power. The Super Finish Max (Upgraded Model) boasts an impressive 450 Watts, which means that it requires less thinning of paint than the Finish Max (Previous Model), which has 400 Watts. This was noticeable during my painting sessions, as I spent less time preparing paint for the Super Finish Max.
Another notable difference is the paint container size. The Super Finish Max comes with a generous 40-ounce container, while the Finish Max offers a smaller 27-ounce container. This discrepancy became apparent when I worked on larger furniture pieces. The Super Finish Max allowed me to cover more surface area before refilling the container.
One feature that truly adds versatility to the Super Finish Max is its interchangeable spray tips. These tips provide different spray patterns, allowing me to adjust the application based on the furniture piece I was working on. Whether I needed a wide spray for broad surfaces or a more focused spray for intricate details, Super Finish Max had me covered.
Changing the filter is also a breeze with Super Finish Max compared to Finish Max. The ease of access to the filter made it convenient for me to clean or replace it when necessary, without hassle. This feature certainly saved me time and effort during the painting process.
Lastly, the flow control knob location is worth mentioning. This sprayer has an easy-to-use flow control knob located on the side. In contrast, on the Finish Max, it is integrated into the trigger. I found the Super Finish Max placement to be more user-friendly as it allowed me to adjust the flow without interrupting my painting flow.
Overall, both the Super Finish Max and the Finish Max are reliable paint sprayers for furniture projects. However, the Super Finish Max’s higher power, larger container, interchangeable spray tips, easier filter change, and ergonomic flow control knob make it the superior choice in terms of convenience and versatility. It certainly enhanced my painting experience and helped me achieve excellent results with less effort.
To test HomeRight Finish Max, I painted the ceiling with it. But guess what?
I discovered that it’s not recommended for this particular task. There is a chance paint could get into the motor if you tilt the sprayer more than 45 degrees. That’s bad! We definitely want to avoid that.
However, I’ve got some good news for you! HomeRight has come up with some fantastic solutions for painting ceilings. They have these amazing products called PaintStick and PaintStick EZ-Twist.
Let me tell you, these babies are perfect for your ceiling painting needs! The Paint sticks are designed with a clever feature that holds paint right in the handle. This means you don’t have to keep going back and forth to refill paint, saving time and effort.
And here’s the best part – the Paint sticks can extend from 54 to 64 inches! That means you can easily reach those high ceiling surfaces without straining yourself or using a ladder. So, while the HomeRight Finish Max may not be suitable for painting ceilings, the PaintStick and PaintStick EZ-Twist are the way to go.
What Comes with My HomeRight Finish Max?

When you purchase the HomeRight Finish Max parts, you will receive the following items:
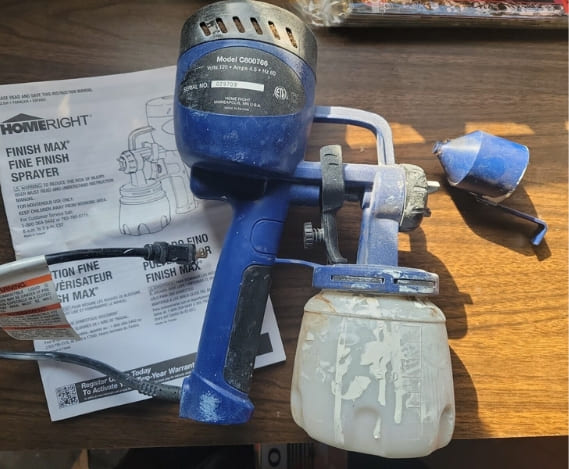
- HomeRight Finish Max C800766 Paint Sprayer
- 27-ounce paint container
- Viscosity cup
- Cleaning brush
- Brass Nozzles
- Instruction manual
Is there anything else I need with my HomeRight Finish Max?
It is recommended to have the following additional items when using the HomeRight Finish Max:
- Paint strainer: Removes impurities from the paint to prevent clogs and ensure a smooth spray.
- Drop cloths: Helps protect surrounding surfaces from overspray.
- Protective gear: Use safety glasses, gloves and respiratory masks when painting.
How do you use HomeRight finish Max paint sprayer?
- Cover nearby objects with drop cloths or masking tape to prevent overspray from reaching them.
- Maintain proper ventilation in the room.
- You may need to thin the paint according to the manufacturer’s instructions. If the paint contains impurities or lumps, strain it to remove them.
- The top container on the sprayer can be filled with strained paint by twisting it off. Avoid overfilling to prevent spills or leaks.
- Choose the spray pattern by rotating the air cap: horizontal, vertical, or circular. You can adjust the spray pattern width by turning the air cap adjustment knob. Start with a low flow setting and gradually increase as needed.
- Test your spray pattern and flow on a scrap piece of cardboard or wood before you begin your project until you get satisfied.
- It’s recommended to maintain an optimal distance of approximately 6-8 inches and move the sprayer slowly to ensure even coverage.
- Maintain a perpendicular spray angle for even coverage.
- You should overlap each pass slightly to avoid streaks or gaps.
- You should clean your sprayer after use by removing the paint container and returning any leftover paint to the paint can. Rinse the container with water.
How to Clean the HomeRight Finish Max?
- Take the sprayer off the power source and remove the paint can.
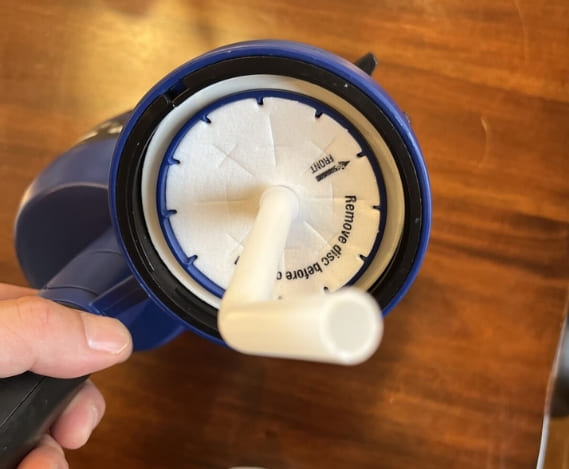
- Pour warm, soapy water into a container. Paint container, air cap, and spray nozzle must be submerged in water.
- You can gently scrub the components with the cleaning brush included. If any dried paint appears on the nozzle or air cap, be sure to remove it.
- To remove soap residue, rinse the components thoroughly with clean water.
- After the sprayer’s components have completely dried, reassemble it.
- Connect a paint container without any paint to the sprayer and run clean water through it. Spray clean water until it runs clear, removing all traces of paint.
- Remove any paint residue or dirt from the sprayer’s exterior with a damp cloth.
Homeright finish max manual
The manual contains detailed instructions on how to use the sprayer effectively and provides valuable information on troubleshooting common issues. Therefore, referring to the sprayer’s manual can be highly beneficial.
My Verdict On Homeright Finish Max C800766
If you’re tired of the traditional brush and roller method for painting walls, furniture, or staining fences, and looking for a cleaner and hassle-free alternative, a paint sprayer is a fantastic option. In this regard, the HomeRight Finish Max C800766 Paint Sprayer is an excellent choice, especially for beginners. It offers all the necessary features for working on furniture or small areas within your home, delivering impressive results at an affordable price.
In HomeRight Finish Max sprayer Review, I hope you’ll discover that it’s a trustworthy and cost-effective option for DIY enthusiasts and homeowners. It provides an easier and more efficient painting method, delivering excellent results. While it may not be suitable for heavy-duty or commercial use, it is an ideal choice for occasional projects and home improvements.
FAQS On HomeRight Finish Max sprayer Review
Why is my Homeright Finish Max not spraying?
If your Homeright Finish Max is not spraying, follow these troubleshooting steps.
- Set the airflow dial on the back of the trigger to maximum. Additionally, pull the trigger as far back as you can.
- You need to clean it regularly. Even after cleaning all parts of the sprayer, check specific areas like nozzles, air caps, and pick-up tubes.
- You should be aware of the two air holes on either side of the pick-up tube, as clogs can prevent spraying. Any blockages can be cleared with a skewer or toothpick.
- If you’re experiencing any issues, try spraying with just water instead of the splash guard. If the water flows easily, it is likely that the paint needs to be thinned or there may be a clog that needs to be cleared.
Does Wagner own Homeright?
HomeRight, a brand owned by Wagner SprayTech Corporation, a Minneapolis-based company and subsidiary of Wagner Holding, is renowned for its advanced paint applicators.
Why is my paint sprayer not holding pressure?
If your paint sprayer doesn’t hold pressure, this could be due to a number of different reasons. One of the possible causes of this problem might be a clogged spray tip, a damaged pump seal, a loose or damaged connection, or a problem with the pressure control valve. If you need assistance troubleshooting your product, you should refer to the product manual or contact the manufacturer for more information.
Do you need to thin paint for HomeRight sprayer?
Thin paint is better for continuous spraying and a smooth finish on a HomeRight sprayer. However, it also depends on the specific model and the type of paint used. It is good to refer to the instruction manual provided with your sprayer for guidelines on paint viscosity and thinning recommendations.
How to thin paint for a HomeRight sprayer?
To thin paint with a HomeRight sprayer, follow these general steps:
- The thinning ratios that are recommended should be compared with those found in the manufacturer’s guidelines or the instruction manual that relates specifically to your HomeRight sprayer model.
- You should begin by stirring the paint before applying it to make sure it is thoroughly mixed. If the paint already has a very thick consistency, it may be necessary to add a paint thinner to help thin it.
- still, if the paint remains too thick even after adding thinner in small amounts, continue to add thinner until the desired viscosity is reached.
- When the paint has been thinned, you can test it by spraying a small amount of it on a testing surface or cardboard to see if it works. Take note of the spray pattern and coverage. If the paint is still too thick or drips or splatters, you may need to thin it more before painting.

Martina Hitchcock
Martina Hitchcock is a versatile author with expertise in different fields. As a paint sprayer expert, she has in-depth knowledge of paint spraying techniques, tools, and equipment. Martina is also an experienced home remodeler who has worked on various projects, including kitchen and bathroom renovations, flooring installations, and room additions. Her knowledge of home improvement and remodeling is extensive, and she enjoys sharing her insights and tips with readers. You can follow her on Facebook.