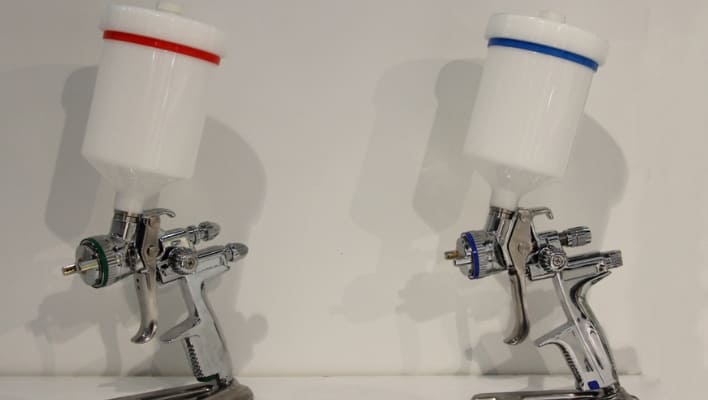
Spray guns may appear complex, but they operate on a straightforward principle. Whether you’re a professional or a DIY enthusiast, understanding how to adjust a paint gun is the key to achieving outstanding results.
In the world of spray painting, the performance of your spray gun can make or break your project. Many aspiring painters are initially discouraged by the underwhelming outcomes, only to discover that it’s not the gun’s fault but the setup that needs attention.
I will guide you how to adjust your paint gun so it’s properly configured, so your painting projects turn out as you imagined.
Table of Contents
- What are the 3 adjustments on a paint gun?
- How do I adjust my spray gun?
- Nozzles
- Air Pressure Control
- Fan Pattern Adjustments
- Fluid Adjustment
- Air Micrometer
- Safety Precautions
- How do you adjust the air pressure on a paint gun?
- Do you know the best pressure for spray painting?
- Choosing the Correct Nozzle Size
- Setting Fluid Flow
- Adjusting the Fan Pattern
- How to adjust spray gun pattern?
- Test Spraying
- Common Mistakes to Avoid
- How to set up hVLP spray gun for clear coat?
- How to set up spray gun for primer?
- What is the most likely cause of the spray pattern defect?
- Why does my spray bottle squirt not spray?
- Why is there not enough paint coming out of my HVLP spray gun?
- Conclusion
- Rosalie Sanchez
What are the 3 adjustments on a paint gun?
- Fan Adjustment
- Fluid Adjustment
- Air pressure Adjustment
How do I adjust my spray gun?
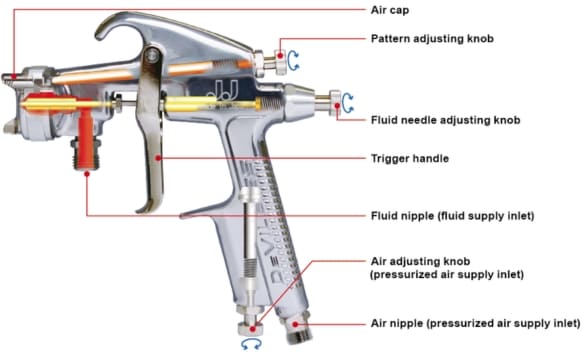
You can adjust your spray gun by yourself, but it’s better to first understand the components of a paint gun.
Nozzles
Paint guns are essential tools, and their functionality relies on their nozzles. Nozzles come in various sizes, and choosing the correct one is an essential decision. Larger nozzles are suitable for thicker coatings, like primers, while smaller nozzles work well for finer finishes, such as clear coats.
Air Pressure Control
The air pressure you apply when spraying greatly affects your work’s final outcome. An air pressure regulator actually adjusts the air pressure to control the atomization of paint. Different painting jobs require different air pressures. For instance, painting a car may require higher pressure than painting a wall. Understanding this step is important for successful paint spraying.
Fan Pattern Adjustments
The fan pattern determines the shape of the spray. Adjusting this feature is essential for controlling the width of the spray, which varies according to your project’s requirements.
Fluid Adjustment
The fluid adjustment control on a paint gun regulates the amount of paint flowing through the gun. This factor gains particular importance when dealing with paints of varying viscosities. For thicker paints, you would increase the fluid setting, while for thinner paints, you’d reduce it.
Air Micrometer
The air micrometer plays a pivotal role in providing precise control over the amount of air supplied to the paint. This control is particularly essential when working on intricate details or striving to achieve specific textural effects in your finish
Safety Precautions
When using a paint gun, always wear protective gear, including goggles, a respirator, and appropriate clothing. Ensure you work in a well-ventilated area to avoid inhaling harmful fumes and strictly follow the manufacturer’s safety guidelines.
How do you adjust the air pressure on a paint gun?
Accurate adjustment of air pressure is important in regulating paint atomization. To adjust the air pressure:
- Connect the air supply to the gun.
- Set the air pressure regulator to the manufacturer’s recommended PSI, typically between 20-30 PSI.
- Examining the spray pattern by trying it out on a cardboard surface and making adjustments to the pressure until you reach a fine mist is a vital part of the process.
Do you know the best pressure for spray painting?
When you’re working with regular spray guns, it’s a good idea to aim for an air pressure between 2.5 to 4 bars at the air cap. This range helps to break down the paint or coating into tiny particles, ensuring that it spreads out nicely and gives you good coverage.
Now, if you’re using an HVLP spray gun, you’ll want to keep the air pressure on the lower side(less than 10 PSI), usually around 0.7 bar. This lower pressure is all about reducing overspray and making your paint application more efficient.
For LVLP spray guns, I’d suggest you go for an air pressure range between 0.7 to 0.8 bars. This range is perfect for efficiency and achieving a fine finish, which can be tailored to your specific material and the type of spray gun you’re using.
When it comes to airless paint sprayers, they work at a much higher pressure, typically between 1200(stains) to 2500 PSI s(thick coating or latex), with some variations based on the type of paint you’re using and the spray tip you’ve got. So, it’s important to adjust the pressure accordingly to get the best results for your project.
Choosing the Correct Nozzle Size
the selection of the appropriate nozzle size is dependent on the paint type and the surface you’re working on. Thicker paints require a larger nozzle, while fine paints need a smaller one.
Example: Imagine you’re working on a fine furniture refinishing project. In this case, a small nozzle, around 1.0mm, is the ideal choice for achieving a smooth and detailed finish.
Setting Fluid Flow
For setting the fluid flow, utilize the fluid control knob to adjust the paint quantity being sprayed. To set the fluid flow:
Example: When painting a detailed object, such as a bicycle frame, you’ll need a lower fluid flow setting for precision. However, for a larger surface like a door, a higher flow setting is suitable.
To adjust the fluid control knob, follow these steps:
- Locate the fluid control knob on your paint gun.
- Start with the knob fully closed.
- Gradually open the knob while test spraying until you achieve the desired paint flow.
- To manage the paint flow, simply rotate the knob to the right to reduce the flow or to the left to increase it.
- Make small adjustments and test-spray on a scrap surface to achieve the desired paint flow rate
Adjusting the Fan Pattern
The fan pattern control alters the width and shape of the spray pattern. To adjust the fan pattern:
- Rotate the fan pattern control knob to make it wider or narrower.
- Test on a practice surface to ensure it matches your project’s requirements.
Testing Insights: When painting a room, I set the fan pattern to a wide setting to efficiently cover large wall areas. However, when it comes to trim or detailed work, switching to a narrow fan pattern will give me better control.
How to adjust spray gun pattern?
Creating the perfect spray pattern involves synchronizing various spray gun controls. I typically start by configuring the spray gun’s controls.
The fluid control knob should initially be set to full open, ensuring maximum fluid delivery. Likewise, the fan control knob should be fully open to provide a full fan pattern.
This setup balances air and fluid for proper atomization. Adequate air supply with the recommended CFM and pressure (PSI) based on the spray gun’s specifications is essential.
To fine-tune the spray pattern, you start by checking it on masking paper. An elliptical pattern with a wet center and a fine outer edge indicates a well-balanced spray. When the air pressure is insufficient, larger paint droplets are evident, affecting atomization. To improve the pattern, you can increase air pressure for finer atomization or decrease fluid delivery using the control knob for a smaller pattern while maintaining fine atomization, ensuring an even and precise paint application.
Test Spraying
Continuously test your settings on a scrap surface to ensure they are calibrated correctly for your project. Adjust your settings as necessary to ensure you get the desired finish. This practice can save you time and paint.
Common Mistakes to Avoid
Overlapping your strokes improperly, maintaining an inconsistent spray speed, or holding the gun at the wrong distance from the surface can lead to paint imperfections. Check out the troubleshooting for Wagner and Graco sprayers.
How to set up hVLP spray gun for clear coat?
To set up your HVLP spray gun for clear coat, follow these steps:
- Choose the right tip size: For clear coats, a smaller tip, typically 1.2-1.3 mm, is ideal.
- Adjust air pressure: Start with lower pressure (around 20-30 psi) and fine-tune as needed.
- Thin your clear coat: It should be appropriately thinned as per the manufacturer’s recommendations.
- Test the spray on a practice surface: Ensure the pattern and atomization are consistent before applying to your project.
How to set up spray gun for primer?
Setting up a spray gun for primer requires different settings:
- Opt for a larger tip size, usually 1.4-1.8 mm, for thicker primers.
- Adjust the air pressure between 30-40 psi.
- Check the primer’s viscosity and thin it if necessary.
- Test your spray pattern to ensure it’s even and well-distributed.
What is the most likely cause of the spray pattern defect?
Spray pattern defects can occur due to:
- Incorrect air pressure or fluid flow settings.
- A clogged or damaged nozzle.
- Poor paint viscosity or improper mixing.
- Inconsistent trigger control.
Why does my spray bottle squirt not spray?
If your spray bottle squirts instead of spraying:
- Check for clogs in the nozzle.
- Ensure the bottle is properly pressurized.
- Verify that the nozzle adjustment allows for a fine mist.
- Clean or replace the nozzle if necessary.
Why is there not enough paint coming out of my HVLP spray gun?
If your HVLP spray gun isn’t delivering enough paint:
- Check for clogs in the nozzle or filter.
- Ensure the air pressure and paint flow settings are correct.
- Verify that your paint is properly thinned.
- Inspect the compressor’s capacity.
Conclusion
Achieving a flawless finish with a paint gun requires precise calibration of various components. By grasping the fundamental setup of your paint gun and adhering to the steps detailed in this guide, you can guarantee the successful outcome of your painting projects. Remember to prioritize safety and practice your skills to perfect your technique, and soon, you’ll be producing professional-quality results every time.
I hope that this comprehensive guide on how to adjust a paint gun provides you with valuable insights.

Rosalie Sanchez
DIY enthusiast with years of experience in home decor and home improvement. With a passion for educating consumers about DIY projects. Every time, I work with our painting professionals to provide you with the best painting product reviews and how-to advice. You can follow me on Facebook.