If you’ve ever given spray painting a try, you may have run into the annoying issue of not getting an even result. Uneven spray paint can leave your project looking blotchy and unprofessional. Here’s how to fix uneven spray paint easily.
You can use fine-grit sandpaper to smooth out the surface to address the issue of uneven coverage when spray painting. Apply another coat of spray paint using even strokes, allowing it to dry before assessing and repeating if necessary for uniform coverage.
Table of Contents
- Fixing Blotchy Spray Paint in One of My Projects
- Causes Of Uneven Spray Paint
- Inadequate Surface Preparation
- Improper Technique
- Clogged Nozzle
- Inconsistent Pressure
- Paint Thickness
- Types Of Uneven And Blotchy Spray Paint
- How To Fix Uneven Spray Paint? Quick Expert Tips for a Perfect Finish
- Step 1: Clean and Prep the Surface
- Step 2: Sanding
- Step 3: Priming
- Step 4: Re-apply Spray Paint
- Step 5: Set The Correct Spraying Pressure
- Step 6: Maintain The Spraying Position
- Step 7: The Painting Process
- Step 8: Check Paint Thickness
- Step 9: Seal and Protect
- Conclusion
- FAQS On how to fix blotchy Or Uneven paint
- How do you fix imperfections in spray paint?
- How to fix mottling paint?
- How do you fix bumpy spray paint?
- How to fix uneven spray paint on glass, plastic, wood and metal?
- Jennifer Marie
Fixing Blotchy Spray Paint in One of My Projects
Here you can see, the table’s surface is looking quite uneven. This is actually my second attempt at staining it, and the first time around was an absolute disaster. I put the stain on following the wood grain, but it gathered and got too dark in some spots.
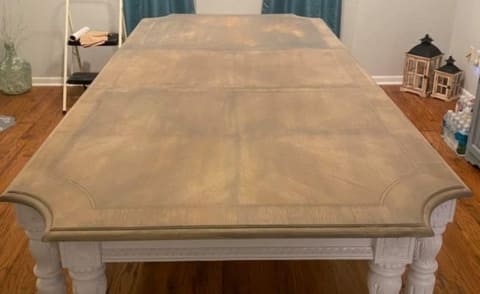
So, back to sanding it down I went – the first time was just to get rid of the original finish.

For round two, I got myself another bottle of the Voodoo Up In Smoke Gel Stain and decided to take a different approach. This time, I applied the stain in one consistent direction and then wiped off the excess to lighten it up. I also used the Dixie Bell spritzer spray bottle, which did help quite a bit. But here’s the kicker – some parts of my table turned out incredibly blotchy, while others didn’t seem to take the stain at all.
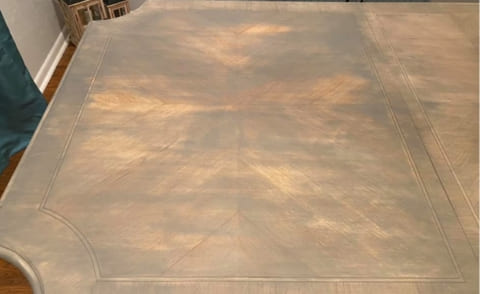
Unless I go super heavy on the application and let it stay dark, which I really don’t want to do, I can’t seem to achieve that even, light gray-washed look that I’m aiming for. During this second round, I used a damp stain pad from Lowe’s to apply the stain and a lint-free cloth to wipe away the excess.
For fixing uneven spray paint, it’s necessary to find out the causes of spray paint issues. Let’s get into them!
Causes Of Uneven Spray Paint
Inadequate Surface Preparation
Overlooking thorough cleaning, sanding, and priming can lead to uneven and blotchy paint results. It’s advisable to make sure the surface is fully cleaned and polished, free from any contaminants, before you apply paint to avoid these issues.
Improper Technique
Using the wrong spraying technique, such as holding the spray can or gun too close or too far from the surface, can result in uneven coverage. Ensure you maintain about 6-12 inches distance from the surface and use refined, overlapping strokes for a uniform coatings.
Clogged Nozzle
A clogged or partially blocked nozzle can disrupt the spray pattern, resulting in blotchy paint. Regularly clean the nozzle and ensure it’s free of debris or dried paint to maintain a flawless spray.
Inconsistent Pressure
Uneven spray paint can also occur when the pressure applied to the spray gun trigger is inconsistent. If you press the trigger too hard or not hard enough while spraying, it can lead to uneven paint distribution. To fix this, practice maintaining a steady trigger pressure throughout the spraying process.
Paint Thickness
Paint that is too thick or too thin can also be the cause of blotchy paint coverage. Instead of using a lot of spray paint at once, it’s better to use a little bit at a time. So, paint one coat at a time and leave it to get dried before you apply the next additional paint coats.
Types Of Uneven And Blotchy Spray Paint
- Overspray and spray bubbling
- Orange Peel Texture
- Sagging or Paint Dripping
- Dry Spray
- Fish Eye
How To Fix Uneven Spray Paint? Quick Expert Tips for a Perfect Finish
I can understand the annoying moment when you have a spray paint job go wrong. Trust me, I’ve been there too! As you know I’m a DIY lover. After trying my new method on different kinds of surfaces like metal, wood, glass, and even plastic, I figured out the ways to fix uneven spray paint. Excited enough for the method? Let’s start the guide!
Step 1: Clean and Prep the Surface
Start by wiping down the area or surface with a clean cloth to get rid of any dust or debris. If there’s grease or oil, use Easy Off heavy-duty degreaser. This degreaser is excellent at breaking down stubborn residues and prepares your surface for a pristine paint job. Allow the surface to dry completely.
Step 2: Sanding
For sanding uneven spray paint, the DEWALT Random Orbital Sander is a great pick. It’s ergonomically designed and provides a flat, even finish every time. You can use fine-grit sandpaper, specifically 320 or 400 grit, for slightly uneven surfaces.
For those deeper imperfections, the 3M sandpaper assortment pack is a versatile choice, giving you various grits to tackle any surface. Sand the surface lightly, and then use a tack cloth to clean away any residue.
Step 3: Priming
I recommend Rust-Oleum primer for fixing uneven spray paint. Rust-Oleum primers stand out as a dependable option, renowned for their exceptional quality. They excel in promoting strong adhesion, guaranteeing a flawlessly even canvas for your painting project. This primer’s superior performance ensures a professional finish, making it a top pick for DIY enthusiasts.
Step 4: Re-apply Spray Paint
Proper assembly and cleanliness are foundational to achieving an even spray pattern and quality layer. When preparing your spray gun, check that every part of the gun is clean, especially the nozzle to prevent paint dripping.
To re-apply quality spray paint, the Neiko professional HVLP spray gun is one of my favorite spray guns. Its precision and ease of cleaning make it a favorite among DIY lovers.
TIP: I used Rust-Oleum Comfort Grip Spray for its exceptional benefits. It enhances control, eliminating uneven spray paint issues. The ergonomic design reduces hand fatigue, making projects more comfortable. This simple add-on transforms DIY work, delivering a smoother, professional finish, making it a must-have for any paint job.
Step 5: Set The Correct Spraying Pressure
Finding the right pressure balance is crucial for a perfect paint job. You must ensure that the paint doesn’t gush out too quickly, that causes unsightly drips.
Conversely, an overly slow pressure might atomize the paint before it hits your surface, creating unwanted textures like orange peels or fish eyes. The ideal method is to adjust the settings, experimenting to find the optimal pressure. Validate your settings by practicing on a piece of cardboard or scrap material, adjusting as needed.
Step 6: Maintain The Spraying Position
How you position the spray gun in relation to your project plays a significant role in the outcome. Typically, maintaining a distance of 6-12 inches from the surface will yield the best results, but this varies based on the specific spray gun type.
For instance, with an air-assisted airless gun, aim for a 10-12 inch gap. A standard gun might require a slightly shorter distance of 8-10 inches, while an HVLP gun works best around 8 inches.
Additionally, remember to hold the gun perpendicular to the surface, moving your arm fluidly without twisting your wrist, ensuring an even application.
Step 7: The Painting Process
Once your paint is thoroughly stirred, blend it with the appropriate thinner and strain it into your gun’s container. When you’re ready to apply, initiate the spray just before the edge of your surface and move steadily across, releasing the trigger after you’ve extended slightly beyond the opposite edge.
This method ensures a neat and overlapping paint application, minimizing the chance of missed spots. After each layer, wait for it to dry – this can be anywhere from 30 minutes to a couple of hours, depending on the paint.
Only when one coat is entirely dry, you should then proceed with the next layer to avoid any paint inconsistencies.
Helpful Guide: Check out our comprehensive guide on fixing sticky spray paint.
Step 8: Check Paint Thickness
“Inadequately mixed paint can lead to the common problem of uneven spray paint application, as pointed out by Madisen Swenson.”
If you are using paint from a paint gun, ensure it’s of the right viscosity. Thin it according to the recommendations by the manufacturer using the correct thinner.
Step 9: Seal and Protect
After achieving that perfect paint feel, protect it with Rust-Oleum clear gloss sealer. This sealer is known for its durability and the glossy shine it imparts, making your project look professional.
Conclusion
Achieving a flawless spray paint finish may require some practice and patience. Pay attention to detail and take your time to get the best results. By understanding the causes of blotchy spray paint and following this step-by-step guide on how to fix uneven spray paint, you can correct any imperfections and achieve a sleek, even texture on your painting works.
FAQS On how to fix blotchy Or Uneven paint
How do you fix imperfections in spray paint?
To repair imperfections in spray paint, start by sanding the affected area gently with fine-grit sandpaper. This helps to smooth out bumps or unevenness. Clean the surface, apply a primer if necessary, and then recoat with spray paint, making sure to follow the recommended distance and technique.
How to fix mottling paint?
Mottling, or uneven paint texture, can be fixed by sanding the surface gently and then applying a high-quality primer. Afterward, spray paint with light, even strokes, and maintain the recommended distance from the surface. This should help eliminate mottling.
How do you fix bumpy spray paint?
If your spray paint has a bumpy texture, it may be due to dust or debris on the surface. Sand the bumpy area, clean it thoroughly, and repaint with light and even strokes. Make sure your spray can is at the right temperature, and shake it well before use to avoid inconsistencies.
How to fix uneven spray paint on glass, plastic, wood and metal?
To fix uneven spray paint on various surfaces like glass, plastic, wood, and metal, ensure the surfaces are clean and dry. Sand lightly, if necessary, apply an appropriate primer, and then spray paint in thin, overlapping passes. Each material may require different primers and techniques, so follow manufacturer’s instructions for best results.

Jennifer Marie
Jennifer Marie is a general contractor with over the years of experience in home remodeling, DIY projects, and commercial painting projects. Her experience includes working with paint sprayers, painting tools, and other painting supplies. You can follow her on Facebook.