Spray paint has gained popularity as a convenient and efficient method for applying a fresh coat of color to various surfaces, from furniture and automotive parts to DIY craft projects. However, despite its many advantages, spray paint bubbling can sometimes be an unexpected and frustrating issue.
Understanding the causes of bubbles in spray paint and learning how to fix it is important for completing the paint job. In this blog, I’ll be diving into the most common causes of spray paint bubbling and provide you with practical solutions to help you tackle this issue effectively.

Table of Contents
- Bubbles in spray paint (Problems & Solutions)
- Why Does Spray Paint Bubble?
- 1. Skipping Prep Work
- 2. Extreme Temperature Conditions
- 3. Applying a Thick Coating
- 4. Surface Contamination
- 5. Incorrect Spray Painting Technique
- How To Fix Spray Paint Bubble Letters?
- 1. Preparation is Key
- 2. Priming
- 3. Optimal Conditions
- 4. Check the Weather
- 5. Ventilation
- air bubbles in paint finish
- 1. Why is my paint bubbling with sprayer?
- 2. Why is my paint bubbling when using a roller?
- Which Method Is More Prone to Paint Bubbles
- Wrapping Up On how to fix spray paint bubbles
- Rosalie Sanchez
Bubbles in spray paint (Problems & Solutions)
| Surface | Why Spray Paint Keeps Bubbling? | Solutions |
| Metal | 1. Surface contamination (e.g., grease, oil, dirt) | 1. Clean the metal surface thoroughly using a degreaser or soap and water. Rinse and dry it completely before painting. |
| 2. Applying paint in high humidity or extreme heat | 2. Paint in ideal weather conditions (around 50-85°F or 10-30°C with low humidity). | |
| 3. Using old or incompatible paint | 3. Use a high-quality metal primer, and ensure it’s compatible with your chosen paint. Shake the paint can well before use. | |
| Wood | 1. Moisture in the wood | 1. Allow the wood to dry completely before painting. Use a moisture meter to check if it’s dry enough. |
| 2. Contaminants on the wood surface (e.g., dust, oils) | 2. Sand the wood surface to remove any contaminants and create a smooth, clean surface for paint adhesion. | |
| 3. Applying paint too thickly | 3. Apply thin, even coats of paint, allowing each coat to dry before applying the next. | |
| Plastic | 1. Surface not properly prepared | 1. Clean the plastic surface with a plastic cleaner or isopropyl alcohol to remove any contaminants. Sand it lightly to create adhesion. |
| 2. Inadequate primer or no primer used | 2. Use a plastic-specific primer before applying the paint. Ensure compatibility between the primer and paint. | |
| 3. Applying paint too thickly | 3. Apply thin coats of paint, allowing each layer to dry before adding additional coats. | |
| Glass | 1. Moisture or condensation on the glass | 1. Ensure the glass is completely dry before painting. Avoid painting in high humidity conditions. |
| 2. Using incompatible paint | 2. Use glass-specific spray paint or enamel. Ensure it’s compatible with glass surfaces. | |
| 3. Applying paint too thickly | 3. Apply very thin coats of paint to avoid creating bubbles. Allow each coat to dry before reapplying. |
Why Does Spray Paint Bubble?
Spray paint blisters can occur for various reasons, and it’s advisable to understand these causes to prevent or fix the issue effectively. Here’s a detailed discussion of each of the causes you mentioned:
1. Skipping Prep Work
- Surface Cleaning: If the surface is dirty, dusty, or greasy, the paint may not adhere properly, forming bubbling in spray painting job. Always clean the item thoroughly with a suitable cleaner or solvent to remove contaminants.
- Sanding and Priming: Failing to sand the area or apply a primer can cause adhesion problems including paint drips and spray paint cracking. The purpose of sanding is to provide a rough surface for the paint to adhere to, while primer provides a bonding layer. Skipping these steps can result in paint bubbling up as it struggles to adhere.
2. Extreme Temperature Conditions
- High Temperatures: Painting in hot weather can cause the solvent in the paint to evaporate too quickly. This rapid evaporation can trap air bubbles in the drying paint, leading to bubbles in the finish.
- Low Temperatures: Cold temperatures might cut down the duration of drying process, which might cause the paint to not set correctly. It is also possible for moisture to get trapped in the paint due to condensation, creating bubbling as the paint dries.
3. Applying a Thick Coating
- Sagging: When too much paint is applied in one coat, it can sag and form bubbles as it dries. It’s better to follow the recommended thinning and application guidelines for the specific paint product you’re using.
- Multiple Coats: If you’re applying multiple coats of paint, make sure to follow the recommended drying times between coats. Applying a fresh layer of paint before the prior one has completely dried may result in the entrapment of solvents and air, potentially causing the formation of bubbles.
4. Surface Contamination
- Residue: Even tiny traces of residue, like fingerprints or silicone-based products, can disrupt paint adhesion. Before starting the painting process, it is essential to perform a thoroughly surface cleaning and degreasing.
- Chemical Reactions: In some cases, the chemicals in the substrate can react with the paint, causing bubbling. Ensure compatibility between the paint and the surface material.
5. Incorrect Spray Painting Technique
- Improper Distance: Holding the spray too close to the surface or too far away can result in uneven paint coverage and potential bubbling. When using airless sprayers, it’s advisable to maintain a distance of 12-14 inches from the surface you’re painting. In contrast, air-assisted airless sprayers work effectively at a slightly closer range of 10-12 inches. When using a conventional spray gun, it’s recommended to hold the gun a bit closer, approximately 8-10 inches from the surface.
- Inconsistent Movement: Rapid or inconsistent movements while spraying may cause uneven application and air entrapment. Maintain a steady, even motion when applying the paint.
How To Fix Spray Paint Bubble Letters?
Here are the quick ways to fix spray paint blisters:
1. Preparation is Key
- Clean Surface: Make sure the surface is thoroughly cleaned to remove any dust, dirt, grease, or contaminants. Scrub the surface using any mild detergent and a soft sponge or cloth for scrubbing the surface, or any soapy water to clean the area. Rinse the surface with clean water, allowing it to dry entirely. Any residual debris can cause paint adhesion issues creating bubbles.
- Sand if Necessary: If the surface has rough spots, peeling paint, or imperfections, consider sanding it lightly with fine-grit sandpaper. The sanding techniques aids in achieving a smooth surface for improved paint adhesion and minimizes the risk of bubble formation.
- Tape and Mask: Tape or mask surfaces you don’t intend to paint, such as trim, hardware, or adjacent surfaces. Proper taping ensures clean lines and prevents overspray, forming uneven paint coverage and potential bubbling.
2. Priming
- Select the Right Primer: It is important to ensure that the chosen primer aligns with both the paint type and the surface you intend to cover.
- One best primer to prevent spray paint bubbling is Rust-Oleum 209460. It stands out as the top choice to prevent spray paint blisters due to its exceptional adhesion properties, compatibility with various surface materials, and suitability for different types of paints, including spray paint.
- Its corrosion-resistant characteristics make it particularly valuable for safeguarding metal surfaces from rust-related paint issues.
- When applying primer, strive for even, thin coats, adhering to the manufacturer’s recommended drying intervals between each application. Applying too much primer or not allowing it to dry properly can cause paint blister formation when you apply the topcoat.
3. Optimal Conditions
- Temperature Control: Painting in extreme temperatures, whether too cold or hot, can cause bubbling. Paint tends to dry too quickly in high heat, trapping air beneath the surface. In cold environmental conditions, be cautious as the paint might struggle to adhere correctly. Aim for a temperature range of 50 to 85 degrees Fahrenheit (10 to 29 degrees Celsius) as recommended by the paint manufacturer.
- Humidity Control: High humidity is also the main cause of bubbling as moisture in the air can get trapped in the paint. You should follow the manufacturer’s humidity recommendations when using paint. Use a hygrometer to measure humidity levels.
4. Check the Weather
- Rain and Wind: Avoid painting outdoors when rain is expected or in windy conditions. Rain can disrupt the paint’s drying process, and wind can carry dust and debris onto the wet paint, causing imperfections.
5. Ventilation
- Proper Ventilation: Prioritize proper ventilation in the painting area to facilitate good air circulation. If you’re indoors, open windows and doors to allow for adequate ventilation. If the space lacks ventilation, use fans to circulate air and exhaust fumes. Proper ventilation helps paint dry evenly and reduces the risk of bubbles due to trapped moisture.
air bubbles in paint finish
Paint bubbling can occur with both paint sprayers and rollers for various reasons, and the likelihood of encountering bubbles may depend on several factors. Here’s an explanation for why you might experience paint bubbling with each method:
1. Why is my paint bubbling with sprayer?
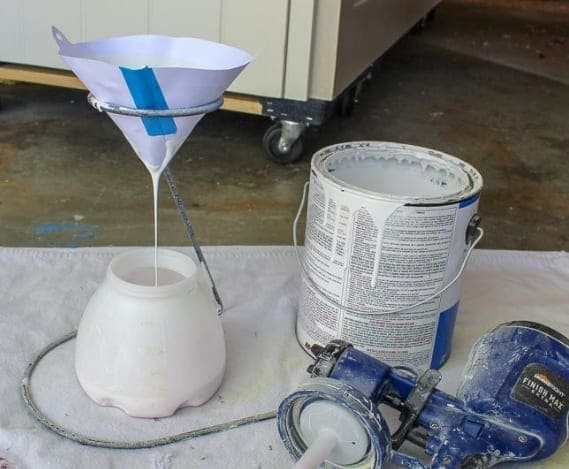
- Inadequate Straining: Here, I was testing Home Right Super Finish Max sprayer to check for paint bubbles. Let me tell you, if you haven’t properly strained your paint before using a sprayer, it can contain impurities, debris, or dried paint particles that can lead to clogs and paint bubbling during application. It’s crucial to strain the paint to ensure a smooth flow.
- Air Pressure Issues: Incorrect air pressure settings on your paint sprayer can lead to uneven paint atomization and result in bubbles. Make sure your sprayer is calibrated correctly for the type of paint you’re using.
- Improper Technique: Using a paint sprayer requires a specific technique. Moving the sprayer too quickly or too slowly, holding it too close or too far from the surface, or overlapping passes inconsistently can all contribute to paint bubbling.
2. Why is my paint bubbling when using a roller?
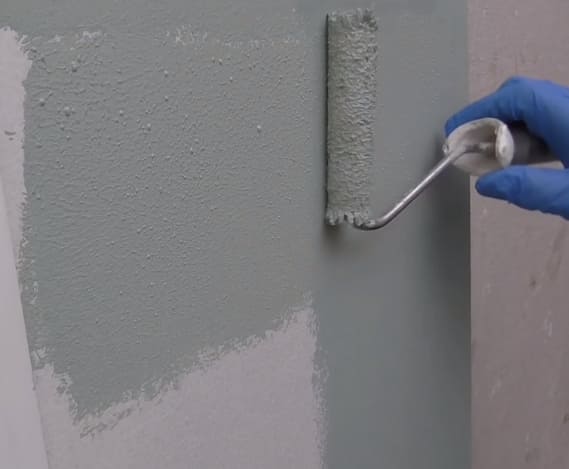
- Incorrect Roller Type: Using the wrong type of roller for your paint and surface can lead to bubbles. For example, using a high-nap roller with a thin paint might create bubbles as excess air gets trapped.
- Improper Application: If you apply excessive pressure while rolling or if you roll over an area multiple times before the previous layer has dried, it can create bubbles. Additionally, applying paint in extremely hot or humid conditions can cause it to dry too quickly, trapping air beneath the surface.
Which Method Is More Prone to Paint Bubbles
The likelihood of encountering paint bubbles may not significantly differ between using a sprayer and a roller. Both methods can produce smooth finishes when executed correctly. The key is to follow best practices for each method, such as proper paint preparation (straining, mixing), choosing the right tools, using the correct technique, and working in suitable environmental conditions.
In summary, both paint sprayers and rollers can result in paint bubbles if not used correctly. The method you choose should align with your project’s requirements, but success ultimately depends on your skill and attention to detail during the painting process.
Wrapping Up On how to fix spray paint bubbles
Spray paint can bubble due to overly thick coatings, improper surface handling, or extreme temperature conditions. To avoid this issue, always pre-treat your surface properly. If bubbles do develop, you now know how to address them. Once familiar with this knowledge, approach your next painting project with confidence, and remember that our guide on spray paint bubbling is here to help you further!

Rosalie Sanchez
DIY enthusiast with years of experience in home decor and home improvement. With a passion for educating consumers about DIY projects. Every time, I work with our painting professionals to provide you with the best painting product reviews and how-to advice. You can follow me on Facebook.