How to whitewash dark wood furniture is the first thought coming to your mind when you want to get rid of dark-looking furniture. I’ve been into this “How to give dark wood a lighter look” thing. It all started when I got this cool vintage side table off eBay. It had this antique vibe I thought would be a perfect match for this beat-up old drawer I had stashed away in my attic. So, it was time to tackle both the attic drawer and this new mango wood side table.
The only hiccup was that the mango wood didn’t quite fit my shabby chic mood. You could call it a phase, but I’ve been all about weathered wood furniture lately. I’ve been daydreaming about giving both pieces a nice whitewash treatment. Let me tell you, it was a bit of work, but it was also loads of fun because the results were worth it.
You can do your own thing, but if you’re curious about how I achieved that weathered look on dark wood furniture, here’s the lowdown on what I did!
Table of Contents
- Step-by-step Guide to Whitewash Dark Wood Furniture:
- How to whitewash Furniture With Sanding
- Step 1: Cleaning and Disassembly
- Step 2: Stain Removal (If Needed)
- Step 3: Sanding
- Step 4: Preparing for Whitewashing
- Step 5: Whitewashing
- Step 6: Drying and Finishing
- how to whitewash furniture without sanding
- Prep the Furniture
- Mix Your Whitewash
- Apply the Whitewash
- Assess and Seal the Deal
- Try it on your own!
- FAQS On whitewash furniture paint
- Can I whitewash over dark-stained wood?
- How do you whitewash dark-painted or already-painted wood?
- How long does whitewash last on wood?
- Jennifer Marie
Step-by-step Guide to Whitewash Dark Wood Furniture:
The textural charm of whitewashing has made it a wood treatment favorite for years. It’s known by regional names like ‘pickling,’ with variations highlighted by Maiden Maxwell’s KK Harris. If you want to know how to whitewash dark wood furniture, here is a step-by-step guide.
How to whitewash Furniture With Sanding
I use this whitewash method if my furniture is stained or needs stripping. It might not be as exciting as the no-sanding route, but let me tell you, the results are like magic. So, let’s get into it:
What you’ll need:
- To clean: Wood cleaning Soap and damp cloth
- Preparing the wood (For Furniture that’s stained): Paintbrush, Stripping Chemicals, Scrapper, Vinegar, and Water
- For Sanding: Goggles, mask, gloves, Orbital Sander, and Wire Brush
- Whitewashing Paint: White stain or white Chalk paint diluted with water, Paint Brush, Fiber-free cloth, and Sealant or finishing wax.
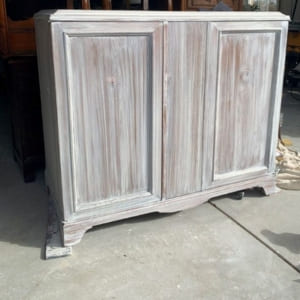
Before:
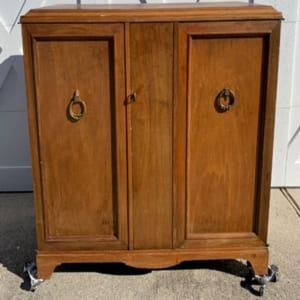
This cabinet had been sitting in the attic, and I finally had time to “lighten it up”. so I decided to try a whitewashing method that worked wonders on my ebony table furniture in the past. Here’s how that method helped me achieve the” Faded rustic furniture look”:

As my previous work was a darker shade of wood, I was confident I could pull through again and help you walk through the whitewashing process as well!
Step 1: Cleaning and Disassembly
Cleaning the whole cabinet was my first task, and it turned out to be a bit trickier than the table. I had to remove all the hardware, like the knobs and drawers. If your furniture is similar, grab some screwdrivers and disassemble it first.
Step 2: Stain Removal (If Needed)
Fortunately, the cabinet had no stains, but I had to do a 15-minute DIY project on my last refurbishing project. If you’re dealing with stains on dark wood, here’s what you can do:
- Put your furniture in a well-ventilated area.
- Use stripping chemicals and apply them with a paintbrush.
- Leave it on for 3-5 minutes, then scrape the paint or stain off.
- Clean the wood with a mixture of vinegar and water to remove any residue.
Step 3: Sanding
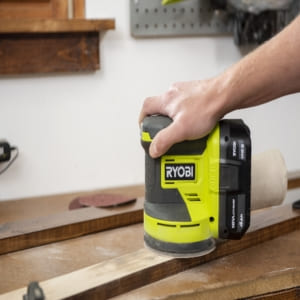
It’s time for some sanding! I used medium-grit sandpaper with Ryobi orbital sander because it’s easy to handle and move around. Remember to consistently follow the wood grain’s direction when working.
Step 4: Preparing for Whitewashing
After sanding, use a wire brush to wipe off all the dust. Prepare the surface by wiping it with a moist cloth to prepare it for the whitewashing process.
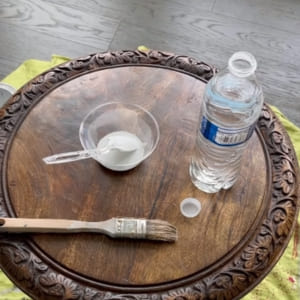
Step 5: Whitewashing
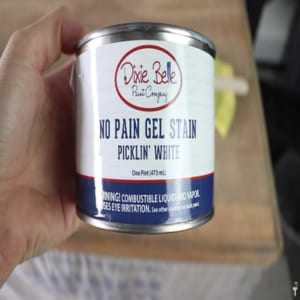
I used a White stain instead of chalk paint because it was unnecessary to dilute it in water. But if you’re using chalk paint, mix a little white chalk paint with water in a bowl and blend it thoroughly to achieve the desired whitewash effect. Depending on the product type and opacity you want, you can dilute the whitewash with water or paint thinner.
Helpful Resource: Here is a guide that explains the difference between stain and paint.
Now, for the crucial part:
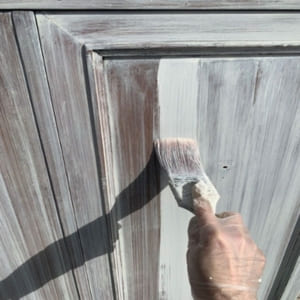
- Choose your paintbrush and have a fiber-free cloth at the ready.
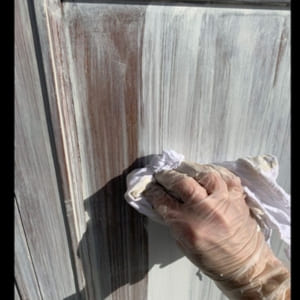
- If you want a weathered look like I did, use a cloth to quickly wipe off the white stain after applying. For full coverage, apply the stain with a brush and let it sit for a while before wiping it off.
- Keep wiping off the excess to achieve that “Faded rustic furniture” look.
- Apply the whitewash in sections, not all at once, and keep wiping off any excess paint with a rag.
- In the case of drawer corners, I recommend using a sponge.
- You can add more layers, but be mindful that each layer covers more of the wood grain.
Related: You may also be interested in learning how to paint white furniture.
Step 6: Drying and Finishing
Let your masterpiece dry, wait at least for 1 hour then sand it again using sandpaper or an orbital Sander.
To finish it off, apply a finishing wax or sealant with a paintbrush. In my case, one coating was enough, and it gave a white-glaze-like appearance. So, I reassembled the knobs and hardware, and voilà! Here’s the final look:
If you want a more opaque “bleached” look, simply re apply the paint until you achieve your desired look. I hope this simple guide inspires you to tackle your own DIY unfinished whitewashing project. Use your creativity to revitalize older, dark wooden furniture by giving it a lighter appearance.
how to whitewash furniture without sanding
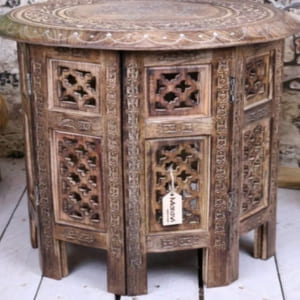
Whitewashing furniture without sanding is one of my favorite activities. I fell in love with the vintage details of the carved mango wood side table that I bought from eBay. Here’s how dark it was:
I wanted to go for a shabby chic aesthetic instead of a dark one:
I didn’t want to risk ruining the beautiful details with stripping or sanding, so I let out my inner maestro of DIY wizardry and started whitewashing directly. So, if you’re like me and prefer a small-scale DIY project, here’s a simple way to whitewash furniture without the hassle of sanding.
What you’ll need:
- Diluted white chalk paint or latex paint
- Paintbrush and a rag cloth
- Sealant or Gel stain
Prep the Furniture
First things first, wipe off any dust from your piece of furniture. See above how to clean and do it in the same way.
Mix Your Whitewash
To create your whitewash mixture, combine equal parts of chalk paint and water. If you have latex paint that’s been sitting for a while, you can add water to it.
The paint-to-water ratio is determined by the desired level of dilution for the final outcome. A suitable initial mix is using equal parts water and paint. Mix this solution thoroughly in a bucket using a long stick or a wooden spoon.
Apply the Whitewash
Now comes the fun part! Decide on your application method:
- You can use a cloth to apply the whitewash for a polished finish.
- Choose a regular paintbrush for a more rugged appearance.
No matter which way you go, just remember to be fast about it. You gotta get rid of that extra whitewash before it turns into a rock. I didn’t water down the paint as much as I usually do when I’m painting furniture. What I did was work on the side table bit by bit. I slapped on some whitewash, then grabbed a dry rag and wiped it off. Give that first coat some time to dry, and don’t go too crazy when you’re putting on the second one. Take it easy; no need to rush.
Assess and Seal the Deal
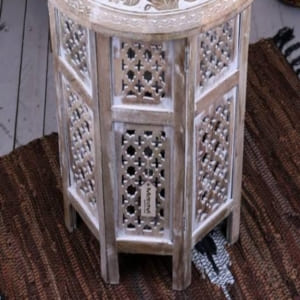
After adding two coats, I was satisfied with the look so I applied a sealant. And here’s the finished look of the details:
Try it on your own!
These simple whitewashing methods are great for people who are just starting to learn how to whitewash dark wood furniture. I have used this to transform oak or pine furniture with whitewash as well. It’s like the perfect entry point for beginners in the world of whitewashing. And don’t sweat it if you don’t have chalk or latex paint—acrylic paint works just fine. Just make sure to thin it out a bit with some water, and you’re all set!
FAQS On whitewash furniture paint
Can I whitewash over dark-stained wood?
Yes, you can give dark-stained wood a whitewash makeover. For the best results, strip off the existing finish and sand it down a bit. This bit of prep work ensures that your whitewash goes on nice and even.
How do you whitewash dark-painted or already-painted wood?
If you’re dealing with dark-painted wood furniture, step one is to use a chemical stripper to say goodbye to that old paint job. Once that’s out of the way, just follow the whitewashing steps we’ve laid out in this guide. You can also use normal latex water-based paint to paint any dark-painted object.
How long does whitewash last on wood?
It depends on a few things, like the type of wood, how well you applied the whitewash, and how much your furniture gets used. Generally, if you do it right, your whitewash finish can hang around for good few years. Want it to last even longer? Follow the guide’s advice and add a satin polyurethane or water-based matte sealant. If you do things just right, that whitewash could keep shining for up to 20 or 30 years with minimal fuss.

Jennifer Marie
Jennifer Marie is a general contractor with over the years of experience in home remodeling, DIY projects, and commercial painting projects. Her experience includes working with paint sprayers, painting tools, and other painting supplies. You can follow her on Facebook.